

ABI 3130xl SACK's
Disclaimers regarding 3130xl SACK's.
- Has ABI approved or recommended them?
- Are they complete and 'fool-proof'?
- Are they all applicable to everyone's instruments?
- Are there any Official Guides here?
ABI 3130xl maintenance
- Do I really need an ABI Service Contract?
- Where to check for 'bubbles'?
- How to fully clean the polymer block.
- How to use the CCD software.
- How to improve Air Quality in your lab?
ABI 3130xl manual controls.
- Why use Manual Controls instead of Wizards?
- When should I use the Wizards?
- Which manual controls can replace Wizards?
- How to stop the piston?
- How to prevent premature laser failure?
- How to initialize polymer delivery pump?
- How much polymer is needed to fill pump chamber?
- How many runs are possible with polymer in pump chamber?
- How to remove bubbles from polymer supply tube?
- How to remove bubbles from pump chamber?
- How to remove bubbles from array port?
- How to remove bubbles from interconnect tube?
- How to pop bubbles in the pump chamber?
- How to fill the polymer pump?
- How to prime the polymer pump?
- How to fill an array?
- How to start runs faster by prewarming oven?
POP-7 longevity.
- Lifespan of POP-7 on a 3130xl?
- When do you need to replace your POP-7?
- How to increase POP-7's longevity?
- What's weird about POP-7 lot numbers?
Minimizing POP7 consumption
- How to add POP-7 with a modified supply bottle?
- How to recapture POP-7 during bubble-removals?
- How to minimize POP-7 usage during bubble-removals?
- How to minimize POP-7 usage when filling a depleted pump?
- How to minimize POP-7 usage when priming a cleaned pump?
- Why do bubbles form in the polymer?
Capillary Array longevity.
- Why do Capillary Arrays need 'regenerating'?
- Does your Capillary Array need 'regenerating'?
- Nitric acid – Warnings & Cautions!
- How to create a manual 'array wash' system?
- How to rinse (water) Capillary Arrays?
- How to clean (nitric acid) Capillary Arrays?
- How to keep Capillary Arrays 'fresh' longer?
- How to reinstall a 'regenerated' array?
- Save polymer installing a New Capillary Array?
3130xl Operation Tips
- Start runs faster by prewarming oven.
- Increase throughput with shorter run modules.
- Automate pump & array cleaning with macro program.
- Allow users to submit sample names on an Excel template.
- Use 'data validated' Excel template to make Plate Records.
- Use Excel template to calculate 'Average Peak Spacing'.
- Omit unwanted initial columns on 96-well plates.
- Restart partially processed plates.
- Alter run order of samples within a plate.
- Proper shutdown procedure for 3130xl.
- Proper startup procedure for 3130xl.
Computer & Software Issues
- How to revive SequenceAnalysis when it vanishes.
- How to restart the 'viewer' if shut down accidently.
- How to view errors if 3130xl software won't fully load.
- Rename computer without re-installing 3130xl Data Collection software.
- Converting ABI 3130xl computer to Windows 10.
- How to resolve solid yellow 3130xl light upon bootup?
- ABI 3130xl: Upgrade to Windows 11.
ABI Resources
Disclaimers regarding 3130xl SACK's
Has ABI approved or recommended them?
No. No one at ABI has made any comments on the information presented in these SACK's; thus, any use of these ideas is at your own risk. Further, some of the information either cannot be found in ABI's official documentation, or even runs counter to that documentation. Nevertheless, many of the ideas were sparked through discussions with various ABI personnel, and all of them have been successfully implemented in our Core. No warranty is made with regard to how well the ideas will transfer to operations in other facilities. (While not officially sanctioned as part of these SACKs, please note that the section entitled "ABI Resources" does refer to documents that were prepared by ABI.)
Are they complete and 'fool-proof'?
Not necessarily. Considerable efforts were made to ensure that no crictical information was left out of the various recommendations and instructions. However, they were written with the expectation that any users would already be reasonably competent with basic 3130xl operations. Further, no testing has been done with respect to a novice operator attempting to implement the instructions without any other guidance. Thus, it is likely that some instructions cannot be regarded as 'step-by-step'.
Are they all applicable to everyone's instruments?
Generally, but not absolutely. Certainly, the basic ideas should be applicable. However, every instrument behaves slightly differently with respect to values achieved for operational parameters. For example, with a clean 50-cm array and fresh POP-7 polymer, our instruments typically have an EP current of ~130-140 (at 15 V) and show peak spacings of ~13-14. However, values for these parameters may be higher or lower at your Core. Nevertheless, the patterns of how these values change (e.g., relative to the amount of time the polymer has been at room temperature) should hold for all 3130xls.
Are there any Official Guides here?
YES... please see ABI Resources. These Chemistry Guides might be a bit dated; however, they are chock-full of useful information.
ABI 3130xl maintenance
Do I really need an ABI Service Contract?
Unfortunately, the answer is...... Yes.
First, without a service contract, you can wait a very long time for a service engineer to appear onsite as 'contract' users have a significant priority. In fact, you might finally be told the engineer will be coming out the next day – only to be told later that you've been bumped to the bottom of the list again because a 'contract' client called in a problem. Second, a single site visit can easily cost ~$2,000 just for travel – not to mention for parts and labor – if you don't have a service contract. So, while the service contracts are expensive, they are essential. If you have sufficient funding, the best bet is to purchase a multi-year contract as it significantly reduces the per year cost.
Where to check for 'bubbles'?
Bubbles in the polymer can lead to electrical arcing, which can result in substandard data, burned interconnect tubing, a burned-out pump block, and even fires. Therefore, with three exceptions, do
Exception #1: Bubbles are of limited concern if their location is above the capillary array tip. Bubbles above the array tip are unlikely to move anywhere – unless they are large bubbles – and they are not in the electrical path between the anode buffer jar and the buffer tray (which bathes the capillary tips).
Exception #2: Bubbles in the polymer supply tube are also out of the electrical path and pose no problems as long as the polymer delivery pump is not 'initialized'. If there is any chance of that occuring during the run, these bubbles must be removed prior to starting the run.
Exception #3: Extremely tiny bubbles (e.g., <1 mm diameter) will sometimes be present. While it is ideal to remove even the tiny bubbles, it might not be essential. For instance, a very tiny bubble just underneath the array tip (any bubble in the interconnect tube will rise to that point eventually) is unlikely to create a break in the electrical conductivity path. On the other hand, corrective measures to remove the bubble through the array port can lead to polymer leaks and ejecting the bubble out the interconnect tube will require ~0.5 ml of polymer. Nevertheless, in view of the potential consequences of bubbles in the electrical path, it is better to err on the side of caution if you have any concerns that the bubble might be a problem.
With internal light on (switch is on right side of instrument), check the following 5 areas:
- Polymer supply tube (instrument can be run if it won’t need to initialize the polymer delivery pump);
- Pump chamber (bubbles could be forced into the array);
- Narrow channels leading to-&-from array port (items 3-5: cause electrical arcing and fires);
- Interconnect tubing; and,
- Narrow channel (in “wedge”) through which polymer enters the anode buffer jar.
How to fully clean the polymer block.
Normally, the Water Wash wizard will do a perfectly adequate job of cleaning the polymer block, although I recommend the following adjustments to the standard protocol:
In extreme cases (e.g., pump is contaminated with problematic ions), it might be necessary to completely dismount the pump from the 3130xl and remove the supply tube and interconnect tube to allow for a more thorough wash. A 20-ml syringe can be used to flush the disassembled pump.
How to use the CCD software.
The CCD software can be invaluable for troubleshooting problems on the 3130xl; however, its misuse can cause serious problems with the instrument. Therefore, I recommend contacting your FSE (field service engineer) for assistance with using the software; if the FSE has confidence in your abilities, the FSE will guide you through the process over the phone... which can save the need for a site visit, getting your 3130xl operational again quickly.
How to improve Air Quality in your lab?
Previously, we had to continually clean the laser-based instruments in our lab. After an ABI service engineer suggested that the incoming air (from the A/C system) must be dirty, we measured particle counts (with a hand-held monitor) at various points in the lab and in the hallway. Above 5.0 µM, the air was very clean (virtually zero counts); however, below 5.0 µM, particle levels skyrocketed ... particularly when we monitored the air flowing directly out of the ducts.
We placed 20X20 Filtrete 1900 MPR filters (1") above the grills (20.5" X 20.5") covering the ducts, taking care to seal (with packing tape) the outside rim of the grills so that the incoming air could not go around the filter. In comparison to incoming air in an adjacent lab (without filters) or even in the hallway, counts from the filtered ducts dropped precipitously for very small particles (≥0.5 µM) and substantially for extremely small particles (0.3 µM) – even though both doors to the lab are left open all day.
Filtered air (Particle counts Filter.xlsx) in A628 was actually cleaner than the air at instrument-level (Typhoon and ABI 3130xl's); however, the air in our room was still much cleaner than the air in the hallway or in the adjacent lab (A653). Basically, although positive outflow of air from the room limits intrusion by hallway air, lab activities and entries by personnel keep some particles airborne. Nevertheless, filtering the air eliminated the need to clean the laser-based instruments.
However, particle loads were so high that the filters started clogging in ~30 days and we soon had to start cleaning the laser-based instruments again. As the 1900 MPR filter is expensive (~$20), we then examined options for increasing its longevity by capturing the larger particles before the air passed through the 1900 MPR filter. Unfortunately, reusable filters – even high-quality ones – removed very few of these small particles. Thus, we began installing Filtrete 1085 MPR filters on top of the 1700 MPR filters instead. The strategy worked, such that we replaced filters only about every 2-3 months; as the 1085 filters cost ~40% less, we saved money as well as time and effort. Unfortunately, LSU informed us that using two filters put too much strain on the air handling system, so we had to revert to a single air filter. In the end, we have settled on changing out the filters after ~2 months of service as a compromise between filtration and costs. As a side benefit, we no longer have much dust on the laboratory benches either!
ABI 3130xl manual controls
Why use Manual Controls instead of Wizards?
The Wizards are wonderful tools for the neophyte operator of the 3130xl, as they do lead you step-by-step (for the most part) through the entire process. However, in order to be 'one-size-fits-all', the Wizards tend to consume considerably more polymer than is necessary to accomplish the stated task – compared to using the Manual Controls.
When should I use the Wizards?
Once you understand the Manual Controls, you will rarely use the Wizards again... except for times where using the Wizard alters the Oracle database. For instance, the 'Array Wizards' (both 'Install Array' and 'Update Cap Array Info') and the 'Replenish Polymer Wizard' keep track of data such as serial numbers, lot numbers, and expiration dates; this information is keyed to each run and is available to ABI when you request troubleshooting help. Thus, if you are putting on an array with a different serial number or switching to a different lot of polymer, you should use the Wizard.
Which manual controls can replace Wizards?
1. Laser
- Set Laser state: Idle/On/Off
- Initialize polymer delivery pump.
- Read piston position.
- Move piston down: 1-38,000 counts
- Move piston up: 1-38,000 counts.
- Fill 'X' cm capillary array.
- Close/Open
- Turn On/Off: On/Off
- Set Oven Temperature: 60.0
How to stop the piston.
There is an option in the Manual Controls for selecting Polymer delivery pump and Stop piston; unfortunately, it has no effect. The only way to stop the piston is to shut down the actual instrument. Fortunately, you are unlikely to need to take such drastic action as I have needed to stop the piston only under two circumstances:
- Poorly-programed mouse macro – For cleaning the arrays, I had a macro set to start with a 'fill', which caused a problem if I had just done a block wash as that process ends with the piston in a 'full down' position. I corrected the problem by programming the array-cleaning macro to start by 'initilizing' the polymer delivery pump.
- Buffer valve closed – Once, while I had the buffer valve closed, I submitted the command to move the piston down by 20,000 units. Although this action could have blown out the interconnect tube, the piston instead groaned continuously as it attempted, without success, to execute the command. Now, I always verify the buffer valve state by tapping the valve pin before submitting commands that will move the piston.
How to prevent premature laser failure?
Whenever you plan to shut down the 3130xl itself, first check the laser state. If it is either On or Idle, use the Manual Controls to select Laser, Set laser state, and Off –
How to initialize the polymer delivery pump?
First, check How much polymer is needed to fill pump chamber? Then, determine if there is sufficient polymer in the supply bottle; if not, add the necessary amount of polymer and wait at least 5-15 minutes (to allow bubbles to rise to the surface of the polymer) before continuing with the rest of this procedure.
If there is sufficient polymer in the supply bottle, select Polymer delivery pump and Initialize polymer delivery pump –
In that case, to close the buffer valve manually, select Buffer valve and Close –
How much polymer is needed to fill pump chamber?
The pump chamber holds 500 µl of polymer, and the piston moves 38,000 counts from its 'home' position to the fully 'down' position. The number of counts that the piston has already moved down is displayed by selecting Polymer delivery pump and Read piston position –
For example, with a reading of '16085', it will require ~212 µl of polymer to refill the pump (16085/38000 * 500 µl). To initialize the pump without introducing air bubbles into the supply tube, there needs to be ~400 µl of polymer in the supply bottle (to keep sufficient polymer depth at the intake tube ).
How many runs possible with existing polymer in chamber?
The pump chamber holds 500 µl of polymer, and the piston moves 38,000 counts from its 'home' position to the fully 'down' position. The number of counts that the piston has already moved down is displayed by selecting Polymer delivery pump and Read piston position –
For example, if you typically get 7 runs from a full chamber (value will vary by instrument and size of capillary array), you should be able to do 4 additional runs with a reading of '16085' ( [ 500-212 µl ] / [ 500 µl / 7 runs ] ). Of course, given the lack of a safety factor in this instance, it would be prudent to plan on only 3 additional runs if there won't be sufficient polymer in the supply bottle to allow the polymer delivery pump to initialize automatically. (Note: 212 µl = 16085/38000 * 500 µl).
How to remove bubbles from polymer supply tube?
First, check How much polymer is needed to fill pump chamber? Then, determine if there is sufficient polymer in the supply bottle; if not, add the necessary amount of polymer and wait at least 5-15 minutes (to allow bubbles to rise to the surface of the polymer) before continuing with the rest of this procedure.
Before eliminating the bubbles, you should also first remove the anode buffer jar; otherwise, you will need to replace that buffer before running samples. If you wish to reuse the polymer, first use the manual controls to discharge the 'dirty' polymer in the interconnect tube; then, with compressed air and a clean Kimwipe, thoroughly dry the 'channel' for the buffer valve pin, followed by the wedge and the valve pin tip. For further information, see How to recapture POP-7 during bubble-removals?. Please note that recovery and re-use of the polymer should be done only if
Draw bubbles out of the supply tube by filling (partially or fully) the pump chamber with polymer. This can be done either by following the 'alternate' directions under How to initialize polymer delivery pump? (with minimal polymer volume in supply bottle), or by selecting Polymer delivery pump and Initialize polymer delivery pump –
If bubbles were not completely cleared, you need to expell enough polymer from the pump chamber to allow for another attempt. To do this, the buffer valve
Next, follow the directions found in the first and third paragraphs above. If these actions clear the bubbles froom the supply tube, complete the job by removing bubbles from the remainder of the system (i.e., pump chamber, array port, interconnect tube, and wedge channel). However, keep in mind that, unless the buffer valve is open, moving the chamber piston downward in counts of >1000 can overpressurise the interconnect tube, causing it to stretch or even
- How to remove bubbles from pump chamber?,
- How to remove bubbles from array port?, and
- How to remove bubbles from interconnect tube?.
How to remove bubbles from pump chamber?
First, check How much polymer is needed to fill pump chamber? Then, determine if there is sufficient polymer in the supply bottle; if not, add the necessary amount of polymer and wait at least 5-15 minutes (to allow bubbles to rise to the surface of the polymer) before continuing with the rest of this procedure.
Before eliminating the bubbles, you should also first remove the anode buffer jar; otherwise, you will need to replace that buffer before running samples. If you wish to reuse the polymer, first discharge the 'dirty' polymer in the interconnect tube; then, with compressed air and a clean Kimwipe, thoroughly dry the 'channel' for the buffer valve pin, followed by the wedge and the valve pin tip. For further information, see How to recapture POP-7 during bubble-removals? Please note that recovery and re-use of the polymer should be done only if
To remove bubbles from the pump chamber, the buffer valve
Resubmit this command until all the bubbles pass into the interconnect tube (or reside above the array tip). Refill the chamber as necessary to complete the operation – keeping in mind the level of polymer in the supply bottle and the need to first close the buffer valve if you use the Move piston up option (rather than Initialize polymer delivery pump). For further information on these 'fill' options, see How to fill the polymer pump?.
Once bubbles have been cleared from the pump chamber, it's time to monitor their progress through the array port, the interconnect tube, and the channel in the wedge. Follow the directions under How to remove bubbles from interconnect tube?; then, if necessary, complete the directions under How to remove bubbles from array port?. Refill the pump chamber as necessary, keeping in mind the cautions noted above. When all bubbles have been cleared from the system, dry the wedge and reinstall the anode buffer jar.
How to remove bubbles from array port?
First, consider whether you really want to remove bubbles from this area. If they are small and unlikely to enter either the array or the interconnect tube, you might want to ignore the bubbles. Bubbles above the array tip are unlikely to move anywhere – unless they are large bubbles – and they are not in the electrical path between the anode buffer jar and the buffer tray (which bathes the capillary tips). For further information on this topic, see Where to check for 'bubbles'?
Otherwise, if you remove the bubbles, the process is likely to eventually cause leakage of polymer around the threads of the array knob. Normally, this leakage will not create any problems; however, it can lead to a continuing leak of polymer. Further, once it dries, the leaked polymer can make it extremely difficult to loosen the array knob. Finally, perform this operation
To remove bubbles from the array port, the buffer valve must be closed – if closed, the valve pin will not move when you tap it with your finger. If the valve is open, first close it by selecting Buffer valve and Close –
High piston counts : Only a limited amount of polymer can excape around the threads of the array knob; thus, executing this command with higher counts can overpressurize and burst the interconnect tube!Array knob : If you undertighten the array knob (after bubble removal), the high pressure of a capillary array fill operation might shove the array tip out of its normal position – deforming the array tip such that it is difficult or impossible to fully insert the tip into the array port.Detector cell : If the array knob does not turn easily when loosening it, the array tip will turn with the knob because leaked polymer has cemented the two parts together. In this case, first open the detector cell block and pull the array combs out of their holders; otherwise, turning the knob might snap the capillaries (which are glass tubes coated with metal). You can also try to 'free up' the knob by attempting to turn it while gripping the array tip firmly – yet gently, so that it isn't crushed – with a sturdy needle-nose pliers.Spatial : Perform a spatial after this operation (as well as after any operation that might shift the detection cell on the array) to verify that the instrument is ready for sequencing.
How to remove bubbles from interconnect tube?
First, verify that there are no bubbles in the polymer supply tube or in the polymer delivery pump chamber; if there are, clear those bubbles first. Then, determine if there is sufficient polymer in the pump chamber to clear the interconnect tube of bubbles; if not, check How much polymer is needed to fill pump chamber? and determine if there is sufficient polymer in the supply bottle to fill the chamber. If necessary, add polymer and wait at least 5-15 minutes (to allow bubbles to rise to the surface of the polymer) before continuing with the rest of this procedure.
Before eliminating the bubbles, you should also first remove the anode buffer jar; otherwise, you will need to replace that buffer before running samples.
To remove bubbles from the interconnect tube, the buffer valve
Resubmit this command until all the bubbles exit the channel in the wedge that normally discharges into the anode buffer jar. Refill the chamber as necessary to complete the operation – keeping in mind the level of polymer in the supply bottle and the need to first close the buffer valve if you use the Move piston up option (rather than Initialize polymer delivery pump). For further information on these 'fill' options, see How to fill the polymer pump?.
After clearing the interconnect tube, determine if you need to clear bubbles from the array port; if necessary, follow the directions under How to remove bubbles from array port?. Refill the pump chamber as necessary, keeping in mind the cautions noted above. When all bubbles have been cleared from the system, dry the wedge and reinstall the anode buffer jar.
How to 'pop' bubbles in the pump chamber?
Small bubbles sometimes appear in the pump chamber, or you may even see them enter the chamber from the supply tube. Rather than immediately trying to flush the bubbles, attempt to pop them instead.
To do this, the buffer valve
If the bubbles return, repeat the above instructions one more time. During this repetition, you can increase the pressure by moving the piston down a total of 1000-2000 counts, as long as you do so in stage of 500 counts. If the bubbles return upon releasing the pressure, give up on this tactic and remove the bubbles as described in How to remove bubbles from pump chamber?.
How to fill the polymer pump?
You can fill the polymer pump either semi-automatically or under complete manual control. Under either scenario, you first need to check How much polymer is needed to fill pump chamber?, and then determine if there is sufficient polymer in the supply bottle. If not, add the necessary amount of polymer and wait at least 5-15 minutes (to allow bubbles to rise to the surface of the polymer) before continuing with the rest of this procedure.
Semi-automatic method: With ≥250 µl
Complete Manual control: Whenever you have concerns that there isn't sufficient polymer in the supply bottle to safely use the semi-automatic method of initializing the polymer delivery pump, fill the pump manually. To do this, the buffer valve
Then, fill the chamber in short bursts by selecting Polymer delivery pump, Move piston up, and ~1000 to 5000 counts –
How to prime the polymer pump?
After washing the pump block, you will need to prime the pump to fill the supply tube, the pump chamber, and the interconnect tube, as well as to fill the array. This can be done automatically by using the Wizard (Replenish Polymer) or under complete manual control; personally, I prefer to use the Wizard through the point of the first 'bubble remove' and then switch to manual control to finish removing the remaining bubbles. For the Wizard, you need a
Wizard: This process is simple, but will consume more polymer than is really necessary if you follow the wizard completely to the end. And, reusing the 'wasted' polymer is not recommended because the initial discharge from the wedge is contaminated with the fluid used to wash the pump. It takes a sharp eye to note when the viscosity of the discharged fluid changes from 'thin' to 'thick', as well as a quick hand to then dry the wedge and put a 1.5 ml tube under the wedge to collect the remaining polymer.
Manual control: In this method, you perform basically the same operations required for manually removing bubbles from the supply tube. Further, because you control the rate of polymer discharge from the interconnect tube, you can stop the process as soon as you are certain that all of the water (used to wash the pump) has been discharged. The required actions are listed below:
- Wipe the supply tube dry with a Kimwipe, and install the polymer supply bottle (with ≥2 ml of fresh polymer).
- With the anode buffer jar still removed, fill the pump chamber by selecting Polymer delivery
pump and Initialize polymer delivery pump –
Send Command .
Note : There should be a distinct interface between the fresh polymer and the water (used to wash the pump); tap valve pin to verify that the buffer valve is open. - Discharge water from pump chamber by selecting Polymer delivery pump, Move piston
down and 3000 counts –
Send Command ; submit command repeatedly until polymer has clearly moved >~2 cm into the interconnect tube. - Refill pump chamber by selecting Polymer delivery pump and Initialize polymer
delivery pump –
Send Command ; when complete, tap valve pin to verify that the buffer valve is open. - Discharge water from interconnect tube by selecting Polymer delivery pump, Move
piston down and 3000 counts–
Send Command ; submit command repeatedly until all bubbles have exited wedge channel and viscosity of the discharge has distinctly thickened.
Caution : To refill the pump, donot simply 'initialize' the pump after this stage, unless you initially added ≥2.5 ml of polymer to the supply bottle. Instead, do it manually, so that you won't introduce bubbles into the supply tube. - Select Buffer valve and Close –
Send Command , to limit backflushing from the interconnect tube. - Select Polymer delivery pump, Move piston up, and 3000 counts –
Send Command ; submit command repeatedly until the chamber is nearly full.Caution : If necessary, temporarily halt this process and add polymer to the supply bottle. - Dry the wedge with a Kimwipe; reinstall anode buffer jar (filled with fresh buffer).
- Check for bubbles in the array port; to determine if it is advisable to remove bubbles from this area, see How to remove bubbles from array port?.
- Flush array with fresh polymer (How to fill an array?).
- If there is sufficient polymer in the supply bottle, continue refilling the pump chamber by selecting
Polymer delivery pump, Move piston up, and 3000 counts –
Send Command ; submit command repeatedly until the chamber is nearly full. - Finally, select Polymer delivery pump and Initialize polymer delivery pump –
Send Command – to completely fill the chamber and open the buffer valve.
How to fill an array?
First, verify that there is sufficient polymer in the pump chamber to complete this action. If uncertain regarding this point, see How many runs possible with existing polymer in chamber?. If the volume is insufficient, check the supply bottle to see if there is enough polymer available to fill the pump chamber (either partially or completely, as desired). If not, add the desired amount of polymer to the supply bottle (see How to add POP-7 with a modified supply bottle?); then, wait at least 5-15 minutes (to allow bubbles to rise to the surface of the polymer) before drawing polymer into the pump chamber (see How to fill the polymer pump?).
Once there is sufficient polymer volume in the pump chamber, use the manual controls to fill the array. For a 50-cm array, select Polymer delivery pump and Fill 50 cm capillary array–
How to start runs faster by prewarming oven?
It takes ~20 minutes for the oven to warm to operating temperature. If samples will be ready for sequencing within ~30 minutes, you can prewarm the oven. Should you become distracted by other events and never start the run, the oven will shut down automatically.
Select Oven, Turn On/Off oven, and On –
Select Oven, Set oven temperature, and 60 –
Click on Instrument Status, and verify that the oven has actually turned on (bar turns
POP-7 longevity
Lifespan of POP-7 on a 3130xl?
According to ABI's documentation, you should discard POP-7 after one week at room temperature. Others have said that POP-7 lasts for many weeks at room temperature. The truth lies somewhere in between these two extremes.
It is true that one can continue to use POP-7 that has been on the instrument for over a month. However, polymer deposits will gradually build up on the capillary walls, slowing the rate of DNA migration (leading to increased peak spacing) and resulting in decreased read length. At some point, data quality will suffer along with read length. Aside from examining each sequence that comes off the 3130xl, the progression of this process can be monitored by tracking the EP current during each pre-run and the peak spacing from each plate (see When do you need to replace your POP-7? and Does your Capillary Array need 'regenerating'? for further information).
From a practical standpoint, we try to keep the age of our POP-7 at room temperature to ≤14 days. By that time, we begin to see substantial rises in the EP current as well as in the peak spacing. Although data quality is still quite good, using the POP-7 for longer than 14 days reduces the capillary array's regeneration interval (for further information, see How to keep Capillary Arrays 'fresh' longer?). To avoid having to waste POP-7, we have modified the supply bottle so that we can easily add polymer on an as-needed basis (for further information, see How to add POP-7 with a modified supply bottle?).
When do you need to replace your POP-7?
From a practical standpoint, we try to keep the age of our POP-7 at room temperature to ≤14 days. By that time, we begin to see substantial rises in the EP current as well as in the peak spacing. Although data quality is still quite good, using the POP-7 for longer than 14 days reduces the capillary array's regeneration interval (for further information, see How to clean 'nitric acid' Capillary Arrays?). To avoid having to waste POP-7, we have modified the supply bottle so that we can easily add polymer on an as-needed basis (for further information, see How to add POP-7 with a modified supply bottle?).
There are two factors that you can monitor to determine if your POP-7 has been on the instrument too long: EP current; and, Peak spacing.
How to increase POP-7's longevity?
Clearly, this is primarily an issue of laboratories which do not have sufficient sample throughput to keep their 3130xl's running nearly all the time. For those who do, the polymer will be used up long before a week has passed. For the rest of us, the following concepts may help.
Temperature is an important factor in maintaining the longevity of POP-7; thus, you should keep POP-7 in the refrigerator until it is needed; however, until ABI designs a cooling chamber into the 3130xl, the only efficient way to keep the polymer cool while in use is to keep the room cool. With energy costs what they are, it isn't cost-effective to maintain air conditioning at 4oC; nevertheless, the cooler the better as far as POP-7's longevity. Get used to wearing a jacket!
Because it inevitably results in bubbles that must be removed (leading to some wasted polymer and lots of wasted time), it is not practical to remove the supply bottle and store it in the refrigerator whenever the 3130xl will be idle. However, if you are going to leave the instrument idle for long enough, you can use the manual controls (for further information, see How to minimize POP-7 usage during bubble-removals?) to discharge most of the polymer into a container and store it in the refrigerator. If done properly, you will not introduce bubbles into the polymer supply tube, and you can return the polymer to the supply bottle when it is needed (see final paragraph).
Another important factor is 'evaporation'. As water evaporates from the polymer, it becomes more viscous. Thus, ensure that polymer bottles are not left open any longer than necessary. Further, it may help to initialize the polymer pump whenever the 3130xl will not be running so as to trap more of it where the water cannot evaporate. Ideally, if you have the resources, you should design a new supply 'bottle' that would minimize the head space above the level of the polymer – which would greatly minimize evaporation.
The best way to increase POP-7 longevity is to use it on an 'as-needed' basis rather than putting on an entire bottle each time. This topic is covered in How to add POP-7 with a modified supply bottle?.
What's weird about POP-7 lot numbers?
Normally, the first two digits of a lot number (for an ABI product) represent the year in which that lot was manufactured; the second two digits indicate the month of manufacture. However, on POP-7, lot numbers represent the date of bottling.
Here's how it works. ABI generates a very large batch of POP-7, which is then stored in large containers under refrigerated conditions. Periodically, those containers are tapped for filling the small bottles of polymer that ABI sells to customers. This is the date referred to by the lot number on POP-7, not the actual manufacture date.
Why is this an issue?
Normally, when you suspect that a particular lot of some reagent was incorrectly manufactured or handled, you obtain a fresh batch of that reagent which bears a different lot number. With POP-7, every bottling of the original large batch of polymer bears a different lot number, even though the polymer was all made at the same time. In fact, when ABI bottles both 3.5 ml and 7.0 ml sizes on the same day, those two bottlings bear different lot numbers. Yet, unless there was an unrecognized problem with the storage conditions of that batch of polymer or unless something odd happened while bottling the polymer, each successive bottling from the original large batch should behave the same – despite the different lot numbers.
Thus, for POP-7, the only way that you can ensure you are testing the system with a truly different batch is to note the expiration date on the bottle. Fortunately, this is based on the original date of manufacture of the large batch, rather than on when the small bottles were filled.
Note: ABI products that lack expiration dates on the product are usually guaranteed for one year from the date you receive them.
Capillary Array longevity
Why do Capillary Arrays need 'regenerating'?
There are no moving parts inside a capillary array and the array is made of glass tubes coated on the outside with metal. Thus, in principle, an array ought to last nearly forever – even though ABI guarantees them only for 100 runs. Unfortunately, accretion of polymer and proteins (contaminants from processed samples) on the capillary lumens ultimately limits the useful life of an array.
Typically, these accretions can be flushed away by repeated washing of the array with water. If water-washing is not sufficient, filling the array with nitric acid (1 N) will hydrolyse the proteins into peptides; this reduces the adhesion of such contaminants to the capillary lumen, enabling subsequent high pressure water to flush them away.
The array can be regenerated in conjunction with washing the polymer block, or by itself. Regenerating the array only requires the least polymer; thus, it is the preferred method unless the array regeneration cycle happens to coincide with the need to wash the block. For further information, see How to rinse (water) Capillary Arrays?, How to clean (nitric acid) Capillary Arrays?, and Nitric acid – Warnings & Cautions!!.
Does your Capillary Array need 'regenerating'?
There are three factors that you can monitor to determine if your capillary array needs to be regenerated: Sequence read length; EP current; and, Peak spacing.
Nitric acid – Warnings & Cautions!
As a point of reference, we used to regenerate 50-cm capillary arrays – without any apparent undesirable effects – at least 8 times. Further, for some 'regenerations', we even left the nitric acid in the array for 2-4 hours rather than only 3-5 minutes as recommended – so, the eventual expected array degradation may be a long time coming... either that, or we were lucky!
Nevertheless, for the most part, we no longer wash our arrays with nitric acid because the 'automated' water-wash (using the mouse-driven macro) to flush the capillary array with >60 ml of nanopure water is normally sufficient. We now perform a nitric acid wash only as a last resort to restore an array; usually, once an array has clogged that badly, even the nitric acid wash does not restore it.
Note 1: If the plunger head begins to leak slightly, it is possible to restore the integrity of the seal. First, remove the plunger from the glass syringe barrel; then, holding the plunger vertically, lightly rap the teflon head against the benchtop several times. Reinsert the plunger into the glass barrel and test the seal; if it still leaks, repeat the rapping with a bit more force. If this technique doesn't work, you can always replace the old teflon head with a new one.
Note 2: The larger 1.0 ml
syringe will fit the array-fill syringe inlet, and it is possible to use that size syringe
to fill the array. Nevertheless, at some point, the excess pressure required to do so will
How to create a manual 'array wash' system?
You need the following parts from either an ABI 3100 sequencer or from the original ABI 3130 polymer delivery setup:
- Upper polymer block;
- Polymer-reserve syringe (5.0 ml);
- Array-fill syringe (250 µl); and,
- Plastic 'bolt' that fastened the interconnect tube into the discharge outlet of the upper polymer block.
- Seal off outlet for the interconnect tube. Ideally, use a solid bolt made of a
material that is impervious to 1 N nitric acid; however, a special thread type is required.
- Alternatively, remove the interconnect tube from the 'bolt' noted in "iv"; then, use a red-hot screw to soften the plastic enough to seal the hole in the bolt. After covering the threads with teflon tape, screw the bolt into the outlet – carefully tightening with a pliers.
- If you choose to use a 'sealant' to plug the outlet, ensure that the sealant is impervious to 1 N nitric acid; otherwise, sealant components might be leached and then deposited on the lumens of the capillary array.
- Screw the 5.0 ml polymer-reserve syringe into the raised inlet connection (the position farthest from where the array knob is attached to the block).
- Screw the array-fill syringe (
250 µl only ) into the remaining inlet. - Attach the 'clogged' capillary array to the block with the array knob and plastic ferrule.
- Ensure that the capillary tips are securely held inside a buffer reservoir (used to store arrays; has a rubber gasket).
- Set the 'wash block' on top of a 50-ml stryofoam tube rack to create a stable surface (the bolt projects out of the block).
- For further information, see How to rinse (water) Capillary Arrays? and How to clean (nitric acid) Capillary Arrays?.
How to rinse (water) Capillary Arrays?
MANUAL WASH (
- Dismount the 'clogged' array from the 3130xl instrument, either through the Wizard or manually.
- Attach the array to the 'array wash' system as described in How to create a manual 'array wash' system?.
- Fill the 5.0 ml polymer-reserve syringe with nanopure water and screw it into the appropriate inlet on the block.
- With one hand over the array-fill syringe, apply a steady, slow pressure to the polymer-reserve
syringe so as to force fluid into the array-fill syringe. If the plunger on the array-fill syringe does
not rise on its own, give it a slight assist. Nevertheless,
be patient! – Excessive pressure Willsnap the syringe. - No fluid can move backward into the polymer-reserve syringe, so now use one hand to steady the
array-fill syringe and one hand to depress its plunger – if the array contains polymer, there
will initially be no apparent movement; however, after ~15-30 seconds, the plunger will slowly depress,
filling the array and forcing fluid out of the capillaries.
Just be patient! – Excessive pressure WILLsnap the syringe. - Repeat steps 4 & 5 until the polymer-reserve syringe is empty; if desired, refill the polymer-reserve syringe and flush the array with another 5.0 ml of nanopure water.
- Choose whether to store or reinstall the array:
- Reinstallation: After disconnecting the array from the wash block, follow the instructions at How to reinstall a 'regenerated' array?.
- Storage: Nanopure water is an aggressive solvent; thus, it probably isn't a good solution for long-term storage. Instead, flush the array with >200 µl of a dilute solution of TE (~1 mM Tris; 0.1 mM EDTA); then, disconnect the array from the wash block and attach the gasketed buffer reservoir and array-tip storage vial (both filled with fresh 1X array buffer).
- Prewarm the oven, using the instructions under How to start runs faster by prewarming oven?
- Press the tray button to bring the autosampler forward.
- Remove the buffer tray and the two water trays; place an empty tray in the buffer tray slot.
- Remove the polymer supply bottle and the anode buffer jar.
- Recovering polymer already on the instrument is not recommended and should be done
only if
absolutely necessary; even under the best of circumstances, you are likely to introduce contaminates (present in the interconnect tube) into your supply bottle and pump... which may have anadverse effect on your sequencing data. However, if you insist, then at least follow these instructions to minimize the chance of collecting contaminated polymer: - Using the manual controls, discharge the 'dirty' polymer in the interconnect tube, and then dry the wedge as discussed in How to recapture POP-7 during Bubble Removals?.
- Place the supply bottle under the wedge.
- Under 'Manual Controls', select Polymer delivery pump and Initialize polymer
delivery pump –
Send Command .
Caution : When action is complete, tap the valve pin to verify that the buffer valve is open, as the next command would burst the interconnect tube if the valve were closed. - Select Move piston down and 38,000 counts –
Send Command . - Repeat this pair of commands (see above) until essentially all of the polymer has been discharged into the supply bottle
- Cap the supply bottle, spin down the polymer, and place the bottle in the refrigerator for storage.
- Open the oven door and the detection cell block; then, carefully remove the array tip from the array port. If the array tip is stuck, it might be necessary to hold the array tip with a needle-nose pliers while unscrewing the capillary array knob; otherwise, the array tip might twist too far and snap one or more of the capillaries. With the tip removed from the pump block, clean any polymer from the array port, the array tip, the double-tapered ferrule, and the capillary array knob. A Kimwipe wetted with nanopure water is ideal for this purpose.
- Reinstall the array and close the oven door.
- Fill a 100 ml beaker (narrow version) with hot nanopure water (~55-60oC;
Caution – if the water is too hot, it could damage the seals in the polymer pump block), insert the supply tube into the beaker, and set it in the gap between the instrument 'wall' and the lower polymer block. - Close the instrument doors to return the autosampler to its operating position
- Either use the Water Wash Wizard directly (repeat ≥5X, cancelling the Wizard each time it reaches the point where it asks for 'polymer information'), or use a mouse-driven macro ('5 repeats') to run the Wizard. Water and old polymer will discharge into the removable tray below. When the operation is complete, dump the accumulated liquid into the appropriate hazardous waste container. notE: The first water-wash will eliminate the vast majority of the polymer from the system; thus, if you dispose of that waste water before continuing with the remaining water-washes, it might be possible to dispose of the remaining waste water by dumping it down the drain – please check your local waste disposal regulations.
- Resubmit the commands to prewarm the oven, as the oven is just about to turn itself off (or, already has).
- Open instrument doors, and refill beaker with hot water; close the doors to return the autosampler to its operating position.
- Either wash the array manually or with a mouse-driven macro. If performing a manual wash:
- Open the 'Manual Control' window, and select Polymer delivery pump
and Initialize polymer delivery pump –
Send Command . - Select Fill 80-cm capillary array –
Send Command . Repeat 2X. This will move the piston to near the bottom of the chamber. - Repeat Steps 'a' and 'b' at least 20X; this will move ~10 ml of water through the array.
- Open the 'Manual Control' window, and select Polymer delivery pump
and Initialize polymer delivery pump –
- For a mouse-driven macro, open the 'Manual Control' window, and set the command boxes to match the manner in which your macro was designed.
- Then, open the mouse-driven macro program. Start the macro for flushing the capillary array, with 20-65 repeats.
- Each repetition takes ~80 seconds to complete, so this process will take 30-75 minutes to complete.
- Note: Exceeding 65 repetitions may overfill the 'buffer' tray collecting the waste discharged by the capillaries.
- For instructions on how to program this macro, see Automate pump & array cleaning with macro program.
- This process will sometimes trigger a 'Leak Detected' error message; the message can be ignored until the wash is complete. At that time, it is necessary to restart the software, as clearing the error will not fully resolve the problem.
- Press the tray button to bring the autosampler forward.
- Remove the buffer tray and discard the contents.
- Choose whether to refill the array with polymer or to dismount it for cleaning with nitric acid:
- Refill with polymer:
- Clean and refill the water and buffer trays, as well as the anode buffer jar.
- Perform other maintenance as necessary.
- Use the wizard to 'Replenish Polymer', taking care to ensure that the supply bottle contains at least 2.5 ml of fresh polymer (see How to prime the polymer pump?). Ideally, the fresh polymer will not have exceeded its expiration date; however, some leeway in this regard is possible as long as the polymer has been properly stored and the expiration date is not too far in the past!
- To move polymer into the array, either manually fill the array (see How to fill an array?) or perform a 'Spatial with Fill'. Given that a spatial is needed at this point anyway, I prefer the latter option.
- Dismount array: manually, or by the Wizard.
- Wizard:
- Open the Wizard, and choose to 'store' the array. This will allow you to reinstall the array on that 3130xl with the Wizard.
- If you choose 'discard', the Oracle database will not allow reinstallion of the array with its correct serial number; however, it will allow you to install it as a 'new' array under a false serial number.
- Manually:
- Open the detection cell block, pull the pump block forward, and completely unscrew the capillary array knob.
- Snap the protective cover over the detection cell.
- Pull out the array combs, unclip the cathode bar, and slip the array tip out of the array port.
- Seal the block with the amber screw plug, so as to minimize the introduction of bubbles into the system and to prevent the polymer from drying out.
- Cover the capillary pins with a gasketed buffer reservoir, and set the capillary array down in a safe place.
- Nitric Acid wash:
Best Practice: Follow the instructions under How to clean (nitric acid) Capillary Arrays?.
How to clean (nitric acid) Capillary Arrays?
Nitric acid wash – Capillary Array: ABI's 3700 DNA sequencer had a Wizard for doing the nitric acid wash. However, this Wizard was dropped from the 3730XL and the 3130xl sequencers; further, it is unclear whether nitric acid might damage the polymer delivery pump on the 3130xl.
Finally, before embarking on a nitric acid wash,
Instructions: Second, it is best to perform the off-line array wash only after first flushing the array of polymer by a few water-washes on the instrument; otherwise, it is extremely easy to snap the glass syringe by applying too much pressure while trying to flush out the polymer manually. Once the polymer has been removed, it is relatively easy to move either water or nitric acid through the array by hand.
Now, if not already done, dismount the capillary array (either with the Wizard or manually – see 'Dismount Array' in above section). As described previously, the protective cover should be attached to the detection cell, the '16-pins' should be secured inside the gasketed buffer reservoir, and the polymer block should be sealed with the amber plug. Then, attach the array to the nitric acid 'wash block' (How to create a manual 'array wash' system?).
Fill the 5.0-ml polymer-reserve syringe (with either water or nitric acid, depending on whether you initially washed the array with water while it was still mounted on the 3130xl), and attach it to the 'wash block'. With one hand over the array-fill syringe, apply a steady, slow pressure to the polymer-reserve syringe so as to force fluid into the array-fill syringe.
No fluid can move backward into the polymer-reserve syringe, so now use one hand to steady the array-fill syringe and one hand to depress its plunger – if the array contains polymer, there will initially be no apparent movement; however, after ~15-30 seconds, the plunger will slowly depress, filling the array and forcing fluid out of the capillaries.
Repeat this process as many times as desired. We usually flush the array with 5.0 ml of nanopure water (unless we used the mouse-driven macro to wash the array with water while still on the 3130xl), and then wash it with 3.0 ml of nitric acid (1 N). Then, we immediately rinse the array with 5.0 ml of nanopure water.
However, for particularly dirty arrays, we may wait 3-5 minutes before flushing the array with water – or, we may perform a second nitric acid wash and then immediately flush the array with another 5.0 ml of nanopure water. If we have also washed the polymer pump block, we reduce the manual water rinse with the polymer-reserve syringe (to only ~1 ml) in favor of using the mouse-driven macro on the 3130xl to rinse the capillary array.
Further Notes regarding On-Instrument Acid Washes:
- In response to periodic queries, I emphasize that I have never performed the nitric acid wash directly on the instrument because of the possibility that the acid might damage other parts of the instrument (block, seals, etc.)... either by normal contact or through undetected leaks in the system. My primary concern would be for the integrity of the two o-ring seals at the top of the pump; I do not know how that material would hold up to acids. As for the other parts of the system, I think that they would safely withstand a nitric acid wash (assuming no leaks and if the nitric acid wash were immediately followed by water washes)... but, I have no data or company information to support that belief.
- Frankly, for the most part, I no longer perform nitric acid washes at all. For normal maintenance of the capillaries, I perform the on-instrument water washes. I perform a nitric acid wash ONLY as a last resort in an effort to recover an array that has not responded well to a water wash treatment. For the nitric acid wash, I do it OFF the instrument using the block/syringe setup described above. It takes time and patience, but it can be effective. The biggest issue (aside, perhaps, from finding a source of the block or syringes) is that one has to apply the pressure completely in line with the syringe (no wobbling, twisting, or tilting) and not force the plunger too hard... or, the syringe can snap. Of course, you should wear glasses, gloves, and a lab coat while performing the nitric acid wash.
- Overall, if I had to guess, I suspect that (with certain precautions) it would be safe to perform the acid wash directly on the instrument... even though I would not recommend the practice. It would probably be necessary to still use 1 N nitric acid, as lower concentrations might eliminate the benefits of the nitric acid wash while not necessarily eliminating the potential detriments. I would not recommend letting the nitric acid remain in the system longer than the time necessary to pump ~3-5 ml through the capillaries; further, I’d suggest performing the acid wash in stages (perhaps one pump chamber full [~1/2 ml] at a time), with flushes of the pump seal chamber with ~20-ml of purified water (by syringe) in between each acid wash. Of course, immediately after doing a nitric acid wash, the Entire system should be Thoroughly washed with purified water. In addition to the on-instrument water washes, remove the pump and thoroughly flush it manually with purified water; further, rinse the outside of the tubing and any other parts that might have contacted the acid.
- Nevertheless, to be perfectly clear, I would not recommend on-instrument acid washing of the capillary arrays; instead, I would perform only water-washes on the instrument and take the capillary array off the instrument to perform manual nitric acid washes.
How to keep Capillary Arrays 'fresh' longer?
There are no moving parts inside a capillary array and the array is made of glass tubes coated on the outside with metal. Thus, in principle, an array ought to last nearly forever – even though ABI guarantees them only for 100 runs. Unfortunately, accretion of polymer and proteins (contaminants from processed samples) on the capillary lumens ultimately limits the useful life of an array.
Accretion of polymer and proteins is the slowest when the 3130xl is processing samples constantly. By contrast, it occurs very rapidly when the instrument is idle for a few days in a row. Thus, if you have no samples to run, you should at least run a Spatial (with
Similarly, when you have <16 samples, process them the day of receipt rather than waiting until more samples arrive. Any savings in polymer that you might achieve by consolidating samples from successive days will be negated by reductions in the array's regeneration cycle. Further, if you perform the recommended Spatial (with fill) instead of running the 'short' set of samples, there won't be any polymer savings either.
Finally, proteins cannot accrete on the capillary lumens unless they are present as contaminants in the samples you are processing. To the extent it's practical, ensure that all users are taking appropriate steps to fully clean their samples, both with respect to DNA templates (especially for cloned DNA) and the final sequencing product.
How to reinstall a 'regenerated' array?
The method of remounting a 'regenerated' array depends on:
(a) how it was dismounted; and,
(b) whether you are putting it back on the same 3130xl or a different instrument.
However, there are two Wizards that deal with Arrays:
1) Install Array; and,
2) Update Cap Array Info.
The "Install Array" option will lead you through the entire process; nevertheless, it will use a substantial amount of polymer in the process. With care, you may conserve some polymer by using the "Update Cap Array Info" option instead. Although the title implies that this Wizard applies only to updating information on the current array (e.g., you inadvertently installed it with the wrong size setting), one can actually use "Update Cap Array Info" to install an entirely brand-new array or to re-install an old array (i.e., if it were dismounted as "Store").
1) Dismounted by Install Array Wizard (selected "Discard").
Remounting requires that you use the Wizard. However, to remount it on the same 3130xl, you must use a fake serial number, as the Oracle database has locked down the real serial number. The correct serial number should be used if you mount the regernated array on a different 3130xl; further, you should manually input the actual 'Array Usage' value from the previous instrument so that the age of the array remains accurate. Of course, there really is no reason to 'discard' the array in the first place, if you are planning to regenerate it.
2) Dismounted by Install Array Wizard (selected "Store").
Remounting requires that you use the Wizard. To remount it on the same 3130xl, you input the the correct serial number, which will restore the previous 'Array Usage' value. If you mount the regernated array on a different 3130xl; you should manually input the actual 'Array Usage' value from the previous instrument so that the age of the array remains accurate.
3) Dismounted manually.
If you mount the array on a different 3130xl, you must use the Wizard and you should manually input the actual 'Array Usage' value from the previous instrument so that the age of the array remains accurate. However, a manual dismount does not alter the Oracle database with respect to the serial number of the array 'on record' for the original instrument. Thus, the regenerated array can be remounted on the same 3130xl without any need to use either Wizard. This process is detailed below:
- With the oven and instrument doors closed, press the Tray button.
- Once the tray has stopped moving (in its forward position), open both sets of doors.
- Snap the cathode bar of the array into position.
- Separate the array combs and put them into the holders on the oven panel (except for the position closest to the detection cell block).
- Move the pump block forward to ease access to the array port for the next step.
- Unclip the protective cover on the detection cell on the array; insert the array tip into the array port on the pump block; and, insert the final array comb in its holder.
- Move the pump block to its operating position; then, while holding the array tip firmly
in place, tighten the array knob thoroughly.
Caution 1 : Take care to ensure that the detection cell ends up fitting flat against the detection cell block – without having to be forced to stay in the proper position and without being jammed against the left edge of the cell block.
Caution 2 : It is critical that the knob be truly tight; if you undertighten the array knob, the high pressure of future capillary array fill operations might shove the array tip out of its normal position – deforming the array tip such that it is difficult or impossible to fully insert the tip into the array port. - Clear bubbles from the interconnect tube (see How to remove bubbles from interconnect tube?) and, if necessary, from the array port (see How to remove bubbles from array port?).
- Fill the capillary array with fresh polymer (see How to fill an array?)
- Perform a spatial (No-Fill); if the results are good (peak heights of >2000, no substantial shoulders on the peaks, baseline dips to ~zero between peaks, spacing between peaks is 15-16, and 'crosses' are at expected tips of the peaks), you're done. Typically, the pattern and approximate peak heights should resemble the spatials for the array prior to its being regenerated.
- If spatial results are poor, try a methanol wash of the detection cell. Typically, you only need to wash the side that fits against the actual instrument; however, sometimes both sides need cleaning.
- Open the oven door and the detection cell block.
- Pull out the two closest array combs and pull the pump block forward.
Caution : Ensure that the detection cell comes out of its position without any difficulty; if friction is holding the detection cell in place, pulling it forward can crack the mirrored surface of the detection cell. - Hold a Kimwipe under the detection cell, and – without touching the detection cell with the pipette tip – squirt ~200 µl of methanol across the detection cell.
- Dry the detection cell with gentle 'puff-blasts' of compressed air, blown across (rather than directly 'at') the detection cell.
- Ensure that the mirrored surface of the detection cell has no 'streaking'; if it does, remove the streaks by gently rubbing the surface with a clean Kim-wipe.
- Push the pump block back into its working position, reinstall the detection cell, and the array combs; close the detection cell block and oven.
- Recheck the spatial; if the results are still not good, either repeat the methanol wash or repeat the spatial wih a 'Fill' (so as to refresh the polymer in the array).
- Note: At times, repeated washes and a 'Fill' might not produced a good spatial. In that case, try washing with fresh methanol as your existing methanol may have absorbed water.
- Refill pump chamber (How to fill the polymer pump?), as needed; close instrument doors.
Save polymer installing a NEW Capillary Array?
There are two Wizards that deal with Arrays:
1) Install Array; and,
2) Update Cap Array Info.
The "Install Array" option will lead you through the entire process; nevertheless, it will use a substantial amount of polymer in the process. With care, you may conserve some polymer by using the "Update Cap Array Info" option instead.
Although the title implies that this Wizard applies only to updating information on the current array (e.g., you inadvertently installed it with the wrong size setting), one can actually use "Update Cap Array Info" to install an entirely brand-new array or to re-install an old array (i.e., if it were dismounted as "Store"). To prime the polymer flow path and new array, follow the instructions for remounting a "Dismounted Manually" array (see How to reinstall a 'regenerated' array?).
Minimizing POP7 consumption
How to add POP-7 with a modified supply bottle?
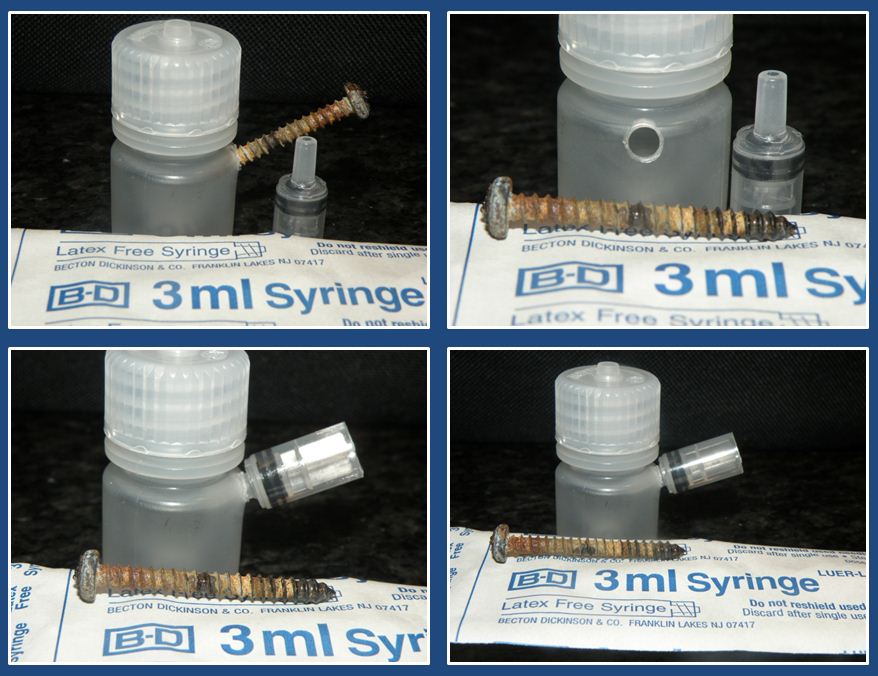
Even if you run your 3130xl's nearly all the time, you can save yourself effort by modifying the supply bottle to allow for the addition of POP-7 on an 'as-needed' basis. This will both keep the polymer fresher (by keeping it in the refrigerator until needed) and largely eliminate the need to perform bubble-removals when replenishing the polymer.
You can modify supply bottles using fairly crude tools (see POP7_Bottle_Modification.jpg). First, use a red-hot screw (held with a pliers, clamped with a wet paper towel) to melt a hole through the upper rim of the supply bottle such that a disposable 3-ml plastic syringe tip fits tightly when pushed into the hole. Then, cut off the syringe ~1 cm above the rubber tip on the plunger; the plunger provides an air-tight seal when the syringe tip is jammed in the supply bottle hole. By making a hole in the supply bottle, you can add polymer without removing the intake tube from the polymer – thereby limiting the potential for getting bubbles into the system.
Before adding new polymer, use the manual controls to draw up nearly all of the old polymer into the chamber of the polymer delivery pump – unless the old polymer is very fresh. Then, draw up the desired volume in either another 3-ml disposable syringe (NEW) or a low-retention pipette tip (either 1000 µl or 200 µl tip, depending on the needed volume). Wipe any excess polymer off the outside of the 'tip'; otherwise, that polymer may adhere to the inside wall of the supply bottle, dry, and later flake into the liquid polymer. Remove the syringe-plug, insert the tip through the hole, and slowly dispense the polymer. Replace the syringe-plug.
A slow dispense rate is especially crucial when using a pipette tip (even with low-retention tips), as it gives the viscous polymer time to slide down the inside walls of the tip. Further, do
When using a syringe to add polymer, throw away the syringe after using it. Over time, even if you rinse out the polymer each time, the rubber gasket will degrade and will eventually deposit tiny black particles into the polymer... leading to IRREVERSIBLE capillary failures. When using pipette tips, it works best to use a fresh tip for each addition because there is a increased tendency for the polymer to adhere to the pipette walls on the second use. Do
How to recapture POP-7 during bubble-removals?
Nevertheless, there are times when it might be appropriate to recover the polymer for reuse. For instance, if you have already cleared the interconnect tube of potentially contaminated polymer, you could collect polymer being discharged to clear bubbles from the piston chamber or the supply tube. To do so, you must first thoroughly dry the wedge to eliminate (or at least drastically reduce) contamination of the recovered polymer with anode buffer.
- Remove the anode buffer jar.
- Thoroughly dry the main surfaces of the wedge with a Kimwipe.
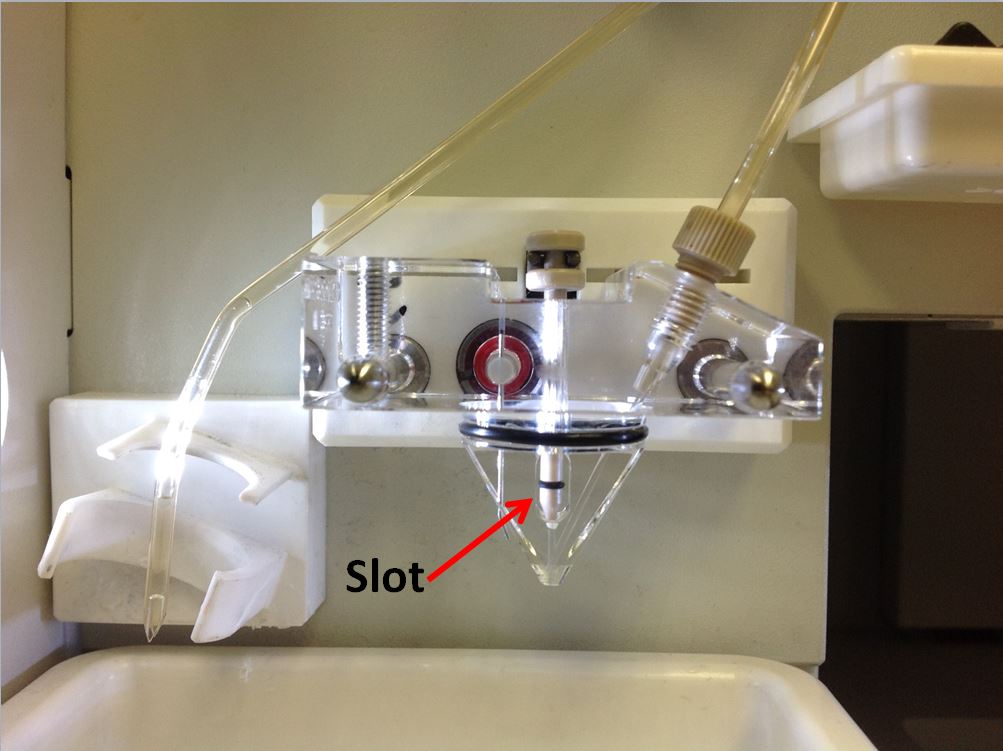
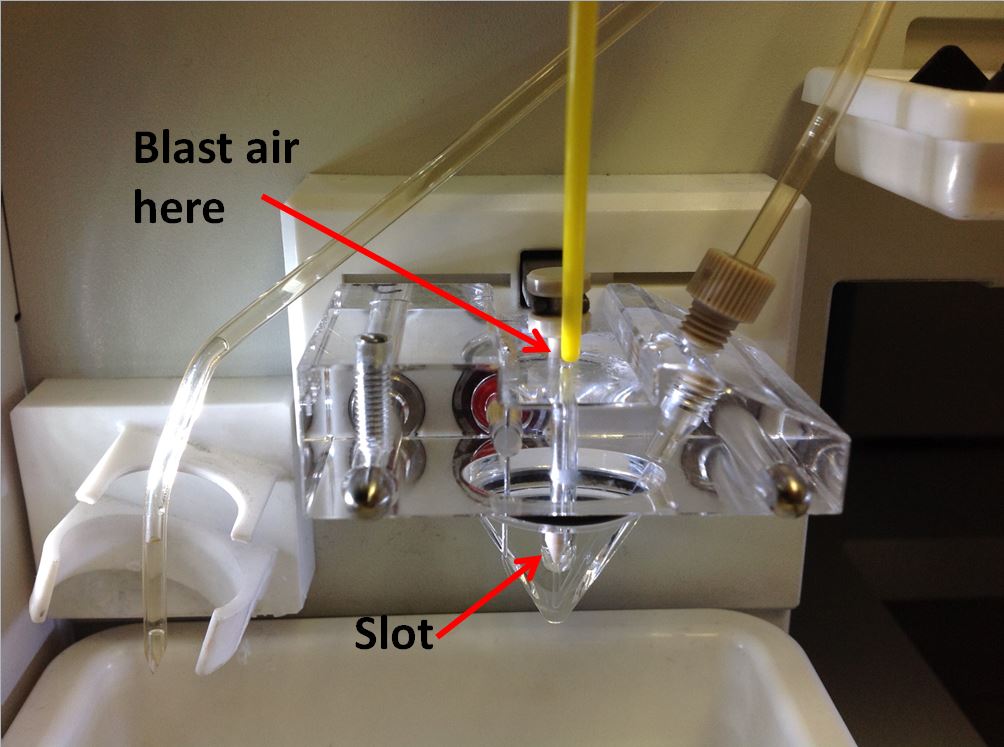
- Holding a Kimwipe under the slot (Wedge-Slot.jpg), blast compressed air through hole in block (through which the valve pin passes; Dry Wedge.jpg) to clear fluid from around the pin.
- With a Kimwipe held behind the slot, blast compressed air through the slot to clear any remaining fluid.
- Hold a clean 1.5 ml tube under the discharge point on the wedge while performing all bubble remove actions. Follow instructions found at How to minimize POP-7 usage during bubble-removals?
- After removing all bubbles (or when all polymer has been discharged from the chamber), use a pipette to suck up the ~100 µl of polymer that hangs up in the wedge slot; add that polymer to the collection tube.
- Spin the collection tube at high speed to remove all bubbles from the collected polymer.
- Immediately return the polymer to the supply bottle (in accordance with How to add POP-7 with a modified supply bottle?); alternatively, mark the tube with the number of days the polymer was at room temperature, and store it in the refrigerator.
- If needed, refill the polymer chamber and repeat Steps 5-9.
- When all bubbles have been cleared, wipe off the wedge with a Kimwipe and reattach the anode buffer jar.
How to minimize POP-7 usage during bubble-removals?
The Bubble Remove Wizard is very simple to use; however, it consumes a considerable amount of polymer. Granted, with care, some of the 'wasted' polymer can be recovered and added back to the supply bottle – but, that mixes more old and new polymer, requires more effort, and requires a minimum of ~0.6 ml of polymer in the supply bottle. Further, as noted in How to recapture POP-7 during bubble-removals?, reusing recovered polymer can lead to a contaminated polymer block and capillary array.
Most importantly, if the bubbles are isolated to the interconnect tube or to the array port, the Wizard will flush the entire system rather than just those specific areas. By contrast, with manual controls, you can greatly minimize how much polymer is discharged from the system. For instructions, see:
How to minimize POP-7 usage when filling a depleted pump?
When the amount of polymer in the pump chamber is insufficient for the number of samples being run, the chamber needs to be replenished. However, sometimes there might be enough polymer in the supply bottle to run the samples, but too little to simply 'initialize' the polymer delivery pump. Under these circumstances, you can avoid adding more polymer to the supply bottle by using the manual controls. This allows you to avoid having more polymer than necessary sitting at room temperature while waiting for additional samples to run. For instructions, see How to fill the polymer pump?.
How to minimize POP-7 usage when priming a cleaned pump?
Using the Wizard is simple, but will consume more polymer than is really necessary. Further, reusing the 'wasted' polymer is not recommended because it is contaminated with the fluid used to wash the pump. By contrast, when using the manual controls, you control the rate of polymer discharge from the interconnect tube; thus, you can stop the process as soon as you are certain that all of the water (used to wash the pump) has been discharged. For instructions, see How to prime the polymer pump?
Why do bubbles form in the polymer?
As long as the bubbles are tiny and not too numerous, they are unlikely to be a problem; however, if they occlude enough of the electrical path, then they can create ‘dirty’ data, or worse, cause a fire. Typically, I will 'ignore' up to ~2-3 tiny bubbles as removing them might waste a lot of polymer; nevertheless, if I have any suspicion that the bubbles could coalesce into a large bubble, I will eliminate the bubbles. For further instructions, see:
- How to remove bubbles from pump chamber?,
- How to remove bubbles from array port?, and
- How to remove bubbles from interconnect tube?.
- The #1 reason is that bubbles can form in the polymer when it warms up. For instance, sometimes our Core’s A/C fluctuates such that the room may warm up by up to ~5oC; when that happens, I will often find bubbles in the system. The bubbles will move to the array port from the supply tube and piston chamber along with the polymer being injected; often, the bubbles will remain at the array port... otherwise, they will move into the interconnect tube and eventually out into the anode buffer jar.
- Air can be sucked into the system through a poorly sealed connector, either at the bottom of the pump or at the array port. I once had to have a pump replaced because bubbles kept getting into the system and nothing stopped it... until ABI replace the pump. Normally, though, replacing the ferrule (at the array port) or tightening the supply tube fitting (or replacing the entire thing) will solve that issue. Teflon tape on the threads of the connector (supply tube) can also help; however, the connectors are designed to work without any teflon tape... thus, if you need the tape, then something is wrong and a part needs replacing. The interconnect tube fitting could also be an issue, but that seems to be less common.
- Issues with adding polymer to the supply bottle (see How to add POP-7 with a modified supply bottle?"):
- It’s best to centrifuge the stock bottle of POP7 prior to pipetting the polymer... this will eliminate any bubbles from the stock solution.
- It's helpful to let the stock bottle of POP7 warm to room temperature prior to pipetting it into the supply bottle.
- Sometimes, when the volume of polymer has gotten really low in the supply bottle, a small bubble will adhere to the intake of the supply tube and will eventually be drawn into the system.
- Similarly, sometimes a bubble will form at the surface of the polymer while adding polymer to the bottle... and it won’t break on its own. This bubble can be drawn into the system later, although the bubble will usually have popped by the time the level of the polymer gets low enough for that to happen. These bubbles can sometimes be popped by hard taps on the side of the bottle (e.g., with the end of a P-1000 pipettor); otherwise, bend a paperclip or other thin object such that you can insert the object through the port (the one you created) in the supply bottle and pop the bubble.
- Ensure that you are using a high-quality Low Retention pipette tip... one without any coatings; the tip should be made out of plastics which are naturally low-retention; otherwise, the coating might leach into the polymer and we have no idea what might happen then.
- Use the tip only once as the polymer will adhere more to the sidewalls on all subsequent uses of the tip... even immediately after using it the first time. Also, some pipette-tip brands work better than others; for instance, I rejected MBP tips for this work because the Rainin tips were noticeably superior with respect to being 'low-retention'.
- Minimize the likelihood of bubble formation by pipetting the polymer very slowly into the supply bottle... slowly enough that the polymer which is adhering to the tip’s sidewalls (even with a low retention tip) follows the meniscus down the tip... and try not to let up on the pipette piston such that it sucks air back into the tip.
3130xl Operation Tips
Start runs faster by prewarming oven.
It takes ~20 minutes for the oven to warm to operating temperature. If samples will be ready for sequencing within ~30 minutes, you can prewarm the oven. Should you become distracted by other events and never start the run, the oven will shut down automatically. For instructions, see How to start runs faster by prewarming oven?.
Increase throughput with shorter run modules.
The standard POP-7 run module for a 50-cm capillary array takes ~2 hours to complete, and it can generate ~1000 bp of sequence data (although quality may drop after ~800-900 bp). Not all users need that long of a read length. Thus, it makes sense to set up additional run modules that use shorter run times – generating shorter read lengths, and increasing sample throughput.
The amount of data generated within a set period of time varies from instrument to instrument, from array to array, and throughout the regeneration cycle of a single array. Thus, it is impossible to state specific times needed to generate particular read lengths for all instruments. Nevertheless, by monitoring your own instrument over a series of standard runs, you can establish the typical read length achieved (for a desired peak spacing) at specific numbers of scans – and convert that information into run times (in seconds).
For example, suppose you want to develop a run module for requests of various read lengths. When an array is generating peak spacings of the highest acceptable value (in our case, ~15), examine sequence data from several different runs to determine the approximate scan number by which each additional 100 bp of data is achieved. For a '400-bp Run Module', note the number of scans required to achieve 500 bp (a 100-bp safety margin); if that were scan number 10,920 (out of 16,440 scans in 120 minutes), you can calculate that the necessary run time is ~80 minutes (or 4,800 seconds).
Based on your data, set up all desired 'short-run' modules, and then test them with a long sequence in all 16 wells. If necessary, adjust the run times and retest. Once you consistently achieve the desired number of bp (plus most of the 100-bp safety margin) for each 'short-run' module, you can use them for actual samples. The safety margin is necessary because there are numerous factors (related to both the instrument and samples) which can slightly alter the migration rate of samples being sequenced.
Automate pump & array cleaning with macro program.
At times, it can be beneficial to repeatedly flush either the pump or the capillary array with water to clean out old polymer residue. With a mouse-based macro program, you can automate these activities (and presumably others) which use the manual controls on the 3130xl. We used to run Workspace Macro 4.6 (Tethys Solutions), but the company is no longer in business so that software is not being updated anymore. Currently, after having updated our 3130xls to Windows 10 (64-bit), we have just begun to use Macro Toolworks – the freeware version seems to work okay... although it is not particularly intuitive.
Setting up each macro appropriately does take some effort, as you must consider what set of functions must be included in each macro in order for them to loop correctly. You also need to set up the macros so that they won't cause the sequencer to pressurize the pump chamber at an inappropriate stage, which could lead to instrument damage if you aren't present to force a shutdown of the process.
Nevertheless, meeting those challenges is relatively simple, and the macros greatly simplify the task of cleaning the pump and the capillary array. If you are having difficulty programming these macros, feel free to email us for assistance.
Allow users to submit sample names on an Excel template.
A generic version of the Excel template (2022 version) can be downloaded at Generic_Sample_Names_template.xlsx (~16 Kb). If desired, the worksheets and the workbook can be 'protected' so that users cannot alter them; however, if you want clients to insert photos of gels, you must check the box for 'edit objects' when protecting the sheets.
Clients enter their sample names on the "Sample Names" sheet; these names are automatically transferred to the sheet labeled "Genomics Core Only". It is critical that users be familiar with the 'rules' on the first worksheet (see cell comments at top), especially the one concerning using 'cut-n-paste' (a term which also applies to dragging the cell data from one location to another with the computer mouse).
Use 'data validated' Excel template to make Plate Records.
A generic version of the Excel template (2022 version) can be downloaded at Generic_Seq_Template_DV.xlsx (~16 Kb). For your purposes, you will need to edit the 'Data_Validation' worksheet as well as the actual template worksheet so that they both match your operation. If users provide their sample names in an Excel file, you can easily transfer the names to this Plate Record template.
- Open the Client's Excel sample name sheet; highlight and copy all sample names.
- Open the generic Plate Record template from within the same instance of Excel. Use 'paste special' (as 'values') to transfer the data into the template.
- Set values for 'priority', 'result group', 'run module', 'operator', 'owner', and 'plate record name'.
- If some 'sets of 16' are not being used at the end of a plate (e.g., if A11-H12 are blank), highlight those rows and click 'Delete' in the Excel program itself.
- If you simply click the 'delete' key on your keyboard, the software will refuse to import the resulting plate record.
- Prior to the final 'H-even_number' needed to include all the samples, all columns in the template must contain valid data at this stage – even if some wells do not actually contain samples.
- Copy the 'name' of the plate record; click 'Save as', paste in the plate record name, and change the file type to 'Text (tab delimited)'.
- Click 'save', 'ok' (at prompt), and 'ok' (at prompt).
- Click 'Plate Manager', and import the text file into the 3130xl database.
- If the import fails due to illegal characters, click on the Excel file and use
'Find–Replace' to replace "spaces" (which is the most common error) with "underscores".
Save the file and retry the file import.
- If the import fails again, examine each name in the Plate Record Excel file to determine how the client has violated the required naming conventions.
- Fix the errors; repeat the import.
- If there are blank 'sets of 16' at the beginning of the plate (e.g., A1-H2) or internally within the samples, highlight the file in the Plate Manager and click 'Edit'. Highlight the desired rows, click 'clear rows', and save the edited file.
- Note: Later, when linking the plate record to the plate, remember to click 'Run View' so that you can verify that the plate record has been edited correctly such that full 'sets of 16' are slated for processing.
Use Excel template to calculate 'Average Peak Spacing'.
Peak height information is useful for determining when the POP-7 has been at room temperature too long or when too much polymer has built up inside the capillary array. Performing this analysis is also an easy way to identify sequences which may benefit from resetting the peak spacing in Sequencing Analysis, as the software will sometimes assign an absurd value for the peak spacing. For further information, see When do you need to replace your POP-7? and Does your Capillary Array need 'regenerating'?.
To simplify this calculation, you can create a macro in Excel with 96 cells for data entry and the value for the 'average peak spacing' calculated in Cell A1. To use the macro, you will probably need to adjust your Excel macro security settings; the safest solution seems to be to create your own digital signature and set your 3130xl's computer as a 'Trusted Publisher'. Calculate average peak heights as follows:
- Open Sequencing Analysis; add all sequences that were run on the same 96-well plate.
- Click the green arrow to start the analysis.
- Click on a peak spacing entry; then, click on the header to the peak spacing column; and, finally copy the data (either by 'edit' and 'copy', or 'Ctrl-C').
- Open the Excel template and paste data in the first of the 96 cells for data entry; the average peak spacing appears in the cell 'A1'.
- To look for outliers, hit 'Alt' and 'F8' to run the data-sort macro.
- Delete entries that you consider to be outliers (either excessively larger or smaller peak spacings than seen for the majority of the samples); the average value is automatically recalculated and displayed in cell 'A1'.
- If desired, replace the peak spacing value in Sequencing Analysis for the outliers (noted in the above step) and reanalyze those sequences.
- Save the results for all sequences, and close Sequencing Analysis.
- Write down the average peak spacing with the rest of the run record information.
- Close the Excel file, without saving the changes to the file.
Negative peak spacings: Design your macro so that these are automatically converted to 'no data'. Then, design the Excel macro to ignore such 'blank' samples so that they do not affect the calculation of average peak spacing.
'13.4', Default value: When the KB caller sees data, but can't figure out a valid peak spacing, it uses a default value of '13.4'. Thus, you should examine such sequences to determine if the 13.4 represents real data or not; if not, you might want to test analyzing such sequences with different peak spacing values. With respect to the Excel macro, design it to ignore values of 13.4 so that they do not affect the calculation of average peak spacing.
Omit unwanted initial columns on 96-well plates.
If you wish to omit any of the 'sets of 16' on a Plate Record, simply click on the file (in the Plate Manager) and edit the file to 'clear rows' in the appropriate zone.
Remember to check the 'Run View' (in the Run Scheduler) to ensure that you didn't inadvertently break apart 'sets of 16'. For example, check to see that the Plate Record doesn't indicate that the 3130xl will try to process only 'A3-H3' out of the set 'A3-H4'.
Restart partially processed plates.
Periodically, a power failure will halt the processing of a plate; in addition, you may need to terminate a plate prematurely yourself. In either case, you will likely want to resume processing the plate with the first set of samples that were not yet fully processed. To do so, following these instructions:
- In Plate Manager, export the Plate Record to the computer desktop.
- Open the file and rename the plate record; save the file under the new name. Note: If the name is not changed within the file itself, the software will refuse to import the file.
- Import the renamed Plate Record.
- Highlight the file, and click 'edit'.
- Highlight rows with samples which have already been fully processed (i.e., all samples that were 'extracted' before the event that caused processing to cease prematurely).
- Click 'clear rows'. Note: You cannot delete the 'processed' samples
prior to importing the renamed Plate Record; if you do, the software will terminate the 'import'. - Save the revised plate record.
- Click on 'Plate View' (in the Run Scheduler) , and 'Find All'; link the revised plate record to the plate.
- Click 'Run View'; examine each run to ensure that you didn't break apart 'sets of 16'. For example, check to see that the Plate Record doesn't indicate that the 3130xl will try to process only 'A3-H3' out of the set 'A3-H4'.
- Click the green arrow to begin processing the plate; click 'ok' when prompted.
Alter run order of samples within a plate.
Run order is controlled by the 'Priority' value assigned on the Plate Record, with '100' being the default setting. Samples with priority values of '<100' will be processed sooner. For example, if you set the Priority of A5-H6 to '99' and A9-H10 to '98' on a full 96-well plate, the run order will be A9-H10, A5-H6, A1-H4, A7-H8, A11-H12.
Proper shutdown procedure for 3130xl.
- Click ‘Instrument Status’ (tree pane, Foundation Data Collection window) to review ‘sensor states’.
- If all settings are ‘off’; skip to Step 3.
- If ‘Laser’ setting is not ‘off’, proceed with Step 2.
- Shut off laser.
- Click “Manual Control”.
- Select: “Laser”; “Set Laser State”; and, “Off”.
- Click “Send Command”.
- Click “Stop All” in Service Console window (wait until all 4 services show red circles).
- Shut off sequencer.
- Shut down Windows on the computer shut off computer.
- For Power Outages: Also disconnect sequencers (twist-&-pull) and computers from wall outlets.
Proper startup procedure for 3130xl.
- Check volumes in polymer delivery pump and supply bottle; if insufficient polymer to fill pump chamber, add required amount of POP-7 to supply bottle (see How to add POP-7 with a modified supply bottle?) before continuing with Step 2.
- Plug in sequencer and computer, if needed.
- Turn on computer and start Windows.
- Power on sequencer by pressing on/off button; wait for green status light.
- Start 3130xl Data Collection Software; wait for all four services to show green squares.
- Expand subfolders.
Computer & Software Issues
How to revive SequenceAnalysis when it vanishes.
If you are running an older version of SequenceAnalysis (pre-Windows 7) on a newer computer (e.g., a dual-core PC), this program will sometimes simply seem to vanish after the Password is input. To restore the program, do the following (for images, see SequenceAnalysis Vanished.docx):
- Open the Task Manager (e.g., use Ctrl-Alt-Del).
- Find the process "javaw.exe", and "End" it (ensure you selected "javaw.exe" and not "java.exe").
- Restart SequenceAnalysis, which will generate an error message about another copy already running.
- Select "Delete existing lockfile" (might require multiple clicks).
- Input the correct Password, and proceed as normal.
How to restart the 'viewer' if shut down accidently.
- If the Viewer for Data Collection was shut down accidentally (e.g., you mistakenly clicked the "x" in the upper-right corner of the Viewer window), you can typically simply re-start the Viewer from the Service Console... as indicated in Restart_3130xl_Viewer.jpg. It is not usually necessary to completely shut-down and re-start the Data Collection software.
- The Viewer can be re-started even during a run.
- However, after the Viewer restarts, you should click "Show Console" for all four services to ensure that there are no errors. If errors exist and a run is ongoing, click the arrow that instructs the instrument to stop after that run is complete; at Instrument idle, shut-down/re-start Data Collection and check again for errors. If errors still exist, ensure that there is sufficient polymer in the Supply Bottle for Instrument initialization and then shut-down and re-boot the entire system (Data Collection, computer, 3130xl). If there is insufficient polymer in the Supply Bottle and you have not modified the bottle to allow for supplementing polymer (see How to add POP-7 with a modified supply bottle?), try shutting down just Data Collection and the computer, and then rebooting those two systems.
- Data collection will proceed even without the Viewer being open; thus, you can simply wait until the runs are complete to resolve the situation. Further, even with errors on the Service Consoles, data collection might proceed normally; thus, it can be smarter to let a set of runs proceed with errors on the Consoles rather than attempting to fix the errors right away. On the other hand, in the absence of a polymer supply issue, the primary concern with fixing the errors before the runs are complete is the need to edit the Plate Record(s)... which is not really that complicated.
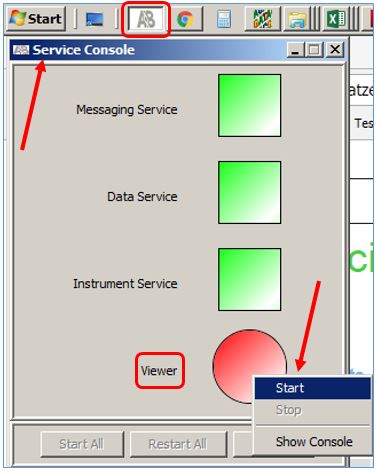
How to view errors if 3130xl software won't fully load.
- Sometimes, Data Collection will fail to fully load. In most cases, the simple solution is to restart Data Collection. Sometimes, one must shut-down Data Collection and restart both the computer and Data Collection; in rare instances, one must also restart the 3130xl itself. If restarting the 3130xl, first ensure that there is sufficient polymer in the Supply Bottle for Instrument initialization; if there is insufficient polymer in the Supply Bottle and you have modified the bottle to allow for supplementing polymer (see How to add POP-7 with a modified supply bottle?), add enough polymer and wait >5 minutes (to allow any bubbles to rise to the surface) before restarting the 3130xl.
- If the above measures fail to resolve the situation, try opening the Service Console, clicking "Show Console" for any Services that are either "Green" or "Yellow", and reviewing the opened windows for error messages. Typically, you will need to discuss the errors with either your FAS or Technical Support in order to determine if there are any further steps you can take to resolve the problem or if a Service call is needed.
Rename computer without re-installing 3130xl Data Collection software.
- Sometimes it can be necessary to change the name of the computer running a 3130xl (e.g., your IT group requires all computers to follow a new naming convention). However, changing the computer name through Windows will not alter the computer name that has been installed in the Data Collection software (and associated ABI software). As such, simply changing the computer name will lead to errors in the operation of the 3130xl and its associated software.
- Of course, one can perform a complete un-install of all ABI related software, change the computer name, and then re-install the ABI-related software. However, all existing run information in Data Collection will be lost and all spectrals will need to be re-run.
- Alternatively, it is possible to manually adjust Data Collection to account for the new computer name... although, there is some risk that the process will fail... ultimately resulting in a complete re-imaging of the computer. Nonetheless, while the process is somewhat time-consuming, it is not difficult and avoids the need to un-install/re-install Data Collection.
- CAUTION: The 3130xl Computer Name Change.docx procedure is based on guidance from ABI; however, there is no guarantee that the procedure will be successful for your system. Thus, it is STRONGLY recommended that you fully backup your settings and data before proceeding. Ideally, you should create an image of your system before proceeding as that will allow you to at least restore the old setup should anything go drastically wrong with the procedure. (01 May 2025: The 2020 protocol specified using WordPad for modifying Oracle files; however, WordPad does not exist in Win11. So, I used NotePad, saving the files first to 'documents' with the *.txt extension, deleting the *.txt extension, and then moving the 2 *.ora files to the location specified in the protocol.)
- The 'Computer Rename' protocol results in the Computer having a name that differs from the 'Instrument ID'. During the Windows 10 upgrade in 2020, the protocol for adjusting the Instrument ID repeatedly failed, but the disjunct between the Computer Name and the Instrument ID never caused any issues. By contrast, during the installation on a Windows 11 computer, I was able to convert the Instrument ID too – most likely because I implemented that procedure before re-installing SeqA and GeneMapper. The process still showed "errors" and was unable to find the JVM.dll file, but the Instrument ID did end up matching the new Computer Name.
Converting ABI 3130xl computer to Windows 10.
Microsoft has rolled-out the final support of Windows 7 with free security updates. As such, facilities with networked instruments running on Windows 7 must upgrade the associated computers to Windows 10, isolate those computers within their organization’s network, or pay Microsoft for continued security support.
Here, we considered isolating our three ABI 3130xl platforms to a private network; however, this would have greatly complicated supporting our clients. Thus, in close coordination with our IT manager, I experimented with installing the vendor software in a Windows 10 (64-bit) environment.
After about a month of mind-rending trial-&-error, we were successful! May this document blaze a path through the cyber-wilderness for anyone else needing to Convert an ABI 3130xl to Windows 10 (ver. 4) [docx].
How to resolve solid yellow 3130xl light upon bootup?
When booting up the 3130xl, the instrument light should first be a solid yellow for ~15 s; then, it should begin to blink and finally turn a solid green within ~45 s. However, sometimes the light never progresses past that initial solid yellow, which means the 3130xl cannot communicate with its associated computer. One possible cause for this failure is that the 3130User Password has been deleted; apparently, one major culprit is power grid failures. So, before you panic or try anything more complex, first try to reset the 3130User Password as follows:
Notes: The 'path' is slightly different in Windows 10 (see 3130-user-set-password.jpg). Also, this process is meant to just reset the Password, and it should work unless your IT has done something like setting restrictions regarding Password complexities. Ensure that the Password never expires, the client is not required to change the Password, and that the 3130User is active.
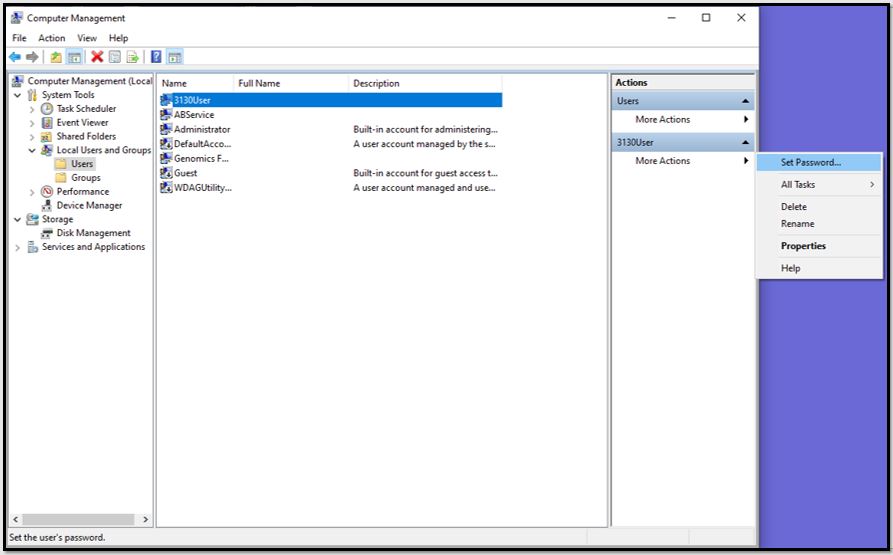
Another possible cause of the solid yellow light is that the computer has reset the Firewall to prohibit the FTP connection required for communication between the computer and the instrument. In 2020, this was a common problem following 'feature' updates in Windows 10, but that eventually stopped happening after several months; fixing the issue merely required editing the firewall to allow the required FTP connections again.
ABI 3130xl: Upgrade to Windows 11.
Windows 10 will reach end of support on 14 October 2025 (i.e., no more free security updates). As such, facilities with networked instruments running on Windows 10 must upgrade (or replace) the associated computers to Windows 11, isolate those computers within their organization’s network, or perhaps pay Microsoft for continued security support. Fortunately, with a few tweaks, the process described at Converting ABI 3130xl computer to Windows 10) works well to install the ABI software on a new Windows 11 computer.
Most differences were minor "pathway" changes between Win10 & Win11; i.e., the goals did not change, just the exact "clicks" needed to achieve them. However, there was a new glitch related to the processor speed! The ABI software checks the registry for the processor speed and exits installation if it does not find an explicit notation of a speed of >2.0GZ... regardless of how fast the processor actually is. This Registry entry is at HKEY_LOCAL_MACHINE, Hardware, Description, CentralProcessor, 0, ProcessorNameString. With my Optiplex SFF Plus 7020, that entry was "Intel(R) Core(TM) i7-14700". Once I edited it to "Intel(R) Core(TM) i7-14700 3.0GZ", the ABI software installed. Of course, since I rebooted between every software install, I had to re-edit that entry multiple times as it would reset to the original entry value with each reboot. (If you cannot locate the ABI software patches, contact me.)
Capillary Array Note: ThermoFisher has discontinued sale of the capillary arrays; however, it appears that suitable substitutes are available from other suppliers. Naturally, the replacements are very expensive; however, I anticipate that the water-wash protocol will extend their lifespan just like it has done for our original ABI arrays.
Service Contracts Note: ThermoFisher no longer provides service for the ABI 3130xl; however, SeqGen.com does and at a still reasonable price.
ABI Resources
DNA Sequencing.
DNA Sequencing by Capillary Electrophoresis Chemistry Guide (pdf; PN 4305080, Rev. C, 05/2009): This official ABI chemistry guide is designed to familiarize you with Applied Biosystems genetic analyzers for automated DNA sequencing by capillary electrophoresis, to provide useful tips for ensuring that you obtain high quality data, and to help troubleshoot common problems.
DNA Fragment Analysis.
DNA Fragment Analysis by Capillary Electrophoresis Chemistry Guide (pdf; PN 4474504, Revision B): This official ABI Chemistry guide is intended for novice and experienced users who plan, conduct, and troubleshoot fragment analysis applications. .
DNA Sequencing Setup & Troubleshooting.
DNA Sequencing Setup & Troubleshooting (pdf): This Powerpoint presention was authored by an ABI Scientific Applications Specialist (Lara Cullen, Ph.D.). I highly recommend it to anyone who either provides DNA sequencing services or wants to improve the quality of DNA sequencing results. The information is presented in an extremely thorough, clear, and logical format.